目前市场上不加壳的App很少见,可以说要想完成对一个App的逆向分析,脱壳是第一步!
ClassLoader
JVM的类加载器
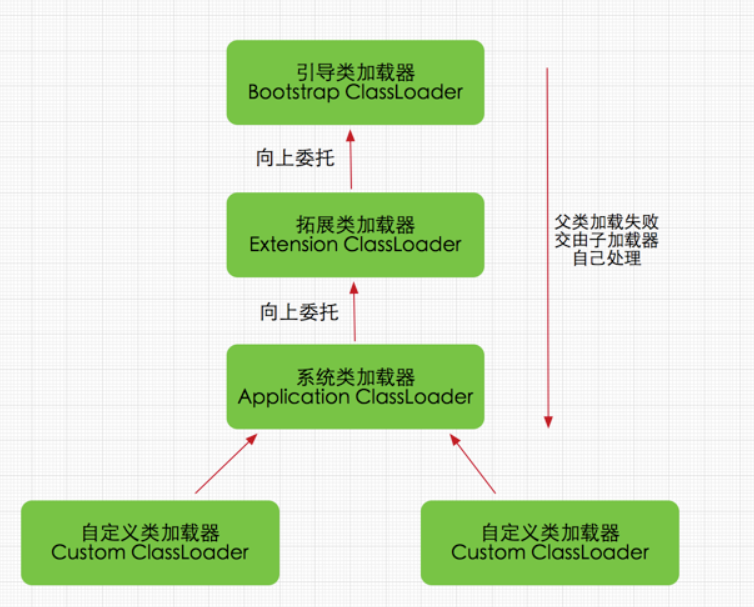
三种类加载器:
Bootstrap ClassLoader(引导类加载器)
C/C++代码实现的加载器,用于加载指定JDK的核心类库,比如java.lang、java.uti等这些系统类.Java虚拟机的启动就是通过Bootstrap,该ClassLoader在java里无法获取,负责加载/lib下的类.
Extensions ClassLoader(拓展类加载器)
Java中的实现类为ExtClassLoader,提供除了系统类之外的额外功能,可以在java里获取,负责加载/lib/ext下的类.
Application ClassLoader(应用程序类加载器)
Java中的实现类为AppClassLoader,是与我们接触最多的类加载器,开发人员写的代码默认就是由它来加载,ClassLoader.getSystemClassLoader返回的就是它.
继承关系:
可以自定义类加载器,只需要通过继承java.lang.ClassLoader类的方式来实现自己的类加载器即可.
双亲委派:
双亲委派模式的工作原理:如果一个类加载器收到了类加载请求,它并不会自己先去加载,而是把这个请求委托给父类的加载器去执行,如果父类加载器还存在其父类加载器,则进一步向上委托,依次递归,请求最终将到达顶层的启动类加载器,如果父类加载器可以完成类加载任务,就成功返回,倘若父类加载器无法完成此加载任务,子加载器才会尝试自己去加载,这就是双亲委派模式.即每个儿子都不愿意干活,每次有活都丢给父亲去干,直到父亲说这件事我也干不了时,儿子自己想办法去完成,这个就是双亲委派.
优点:
避免重复加载,如果已经加载过一次Class,可以直接读取已经加载的Class.
更加安全,无法自定义类来替代系统的类,可以防止核心API库被随意篡改.
类加载时机:
隐式加载:
创建类的实例.
访问类的静态变量,或者为静态变量赋值.
调用类的静态方法.
使用反射方式来强制创建某个类或接口对应的java.lang.Class对象.
初始化某个类的子类.
显式加载:
使用LoadClass()加载.
使用forName()加载.
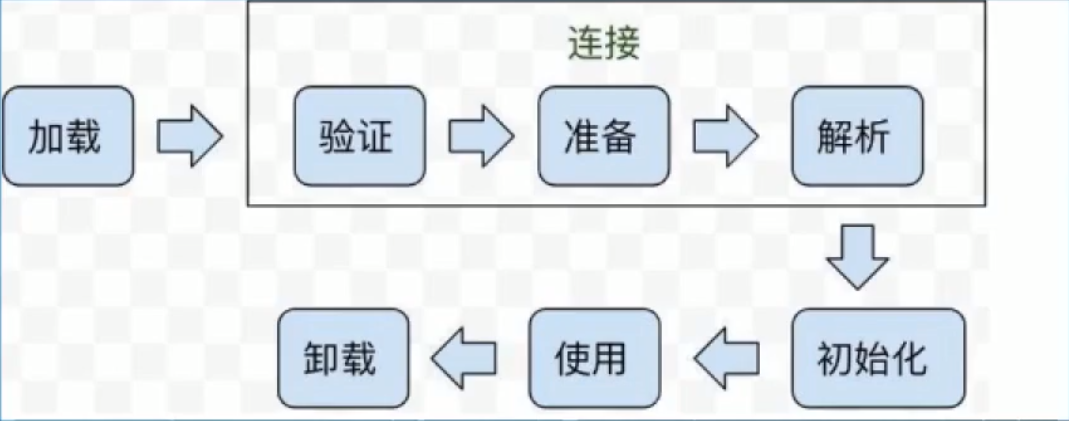
类装载流程:
装载,查找和导入Class文件.
链接,其中解析步骤是可以选择的.
检查,检查载入的class文件数据的正确性.
准备,给类的静态变量分配存储空间.
解析,将符号引用转成直接引用.
初始化,即调用函数,对静态变量,静态代码块执行初始化工作.
Android的类加载器
继承关系:
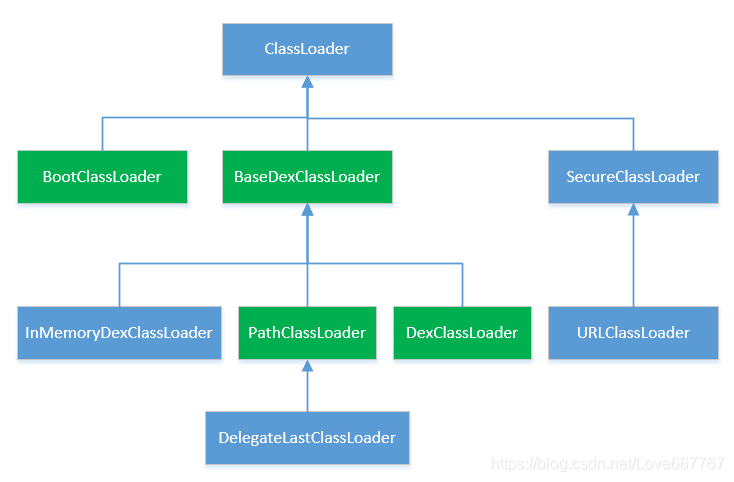
上图为Android系统中的ClassLoader的继承关系图,其中InMemoryDexClassLoader为Android8.0新引入的ClassLoader
ClassLoader:
为抽象类.
BootClassLoader:
预加载常用类,单例模式.与Java中的BootClassLoader不同,它并不是由C/C++代码实现,而是由Java实现的.
BaseDexClassLoader:
是InMemoryDexClassLoader、PathClassLoader、DexClassLoader的父类.类加载的主要逻辑 都是在BaseDexClassLoader完成的.
SecureClassLoader:
继承了抽象类ClassLoader,扩展了ClassLoader类加入了权限方面的功能,加强了安全性,其子类URLClassLoader是用URL路径从jar文件中加载类和资源.
InMemoryDexClassLoader:
Android8.0新引入的,可以直接从内存中加载dex.
PathClassLoader:
是Android默认使用的类加载器 ,一个apk中的Activity等类便是在其中加载.
DexClassLoader:
可以加载任意目录下的dex/jar/apk/zip文件,比PathClassLoader更灵活,是实现插件化、热修复以及dex加壳的重点.
源码分析:
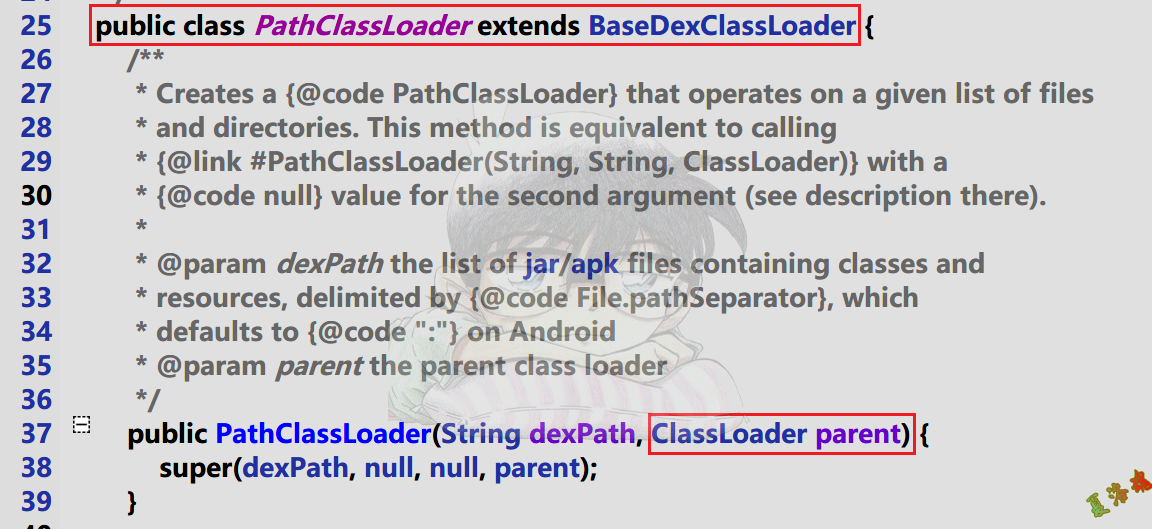
每个ClassLoader在构造时都会传一个父ClassLoader,遵循双亲委派机制.下图以PathClassLoader为例.
代码验证:
本次主要验证Activity是否由PathClassLoader加载,以及双亲委派机制.
 1
 2
 3
 4
 5
 6
 7
 8
 9
10
11
12
13
14
15
16
17
18
19
20
21
22
23
24
25
26
27
28
29
30
31
32
33
34
35
package org.example.luoclassloader ;
import androidx.appcompat.app.AppCompatActivity ;
import android.os.Bundle ;
import android.util.Log ;
public class MainActivity extends AppCompatActivity {
private final String TAG = "[LuoHun] " ;
@Override
protected void onCreate ( Bundle savedInstanceState ) {
super . onCreate ( savedInstanceState );
setContentView ( R . layout . activity_main );
tstClassLoader ();
}
void tstClassLoader () {
ClassLoader thisClassLoader = MainActivity . class . getClassLoader ();
Log . d ( TAG , "app: " + thisClassLoader );
ClassLoader parentClassLoader = thisClassLoader . getParent ();
while ( parentClassLoader != null ) {
Log . d ( TAG , "this: " + thisClassLoader + " -->parent: " + parentClassLoader );
thisClassLoader = parentClassLoader ;
parentClassLoader = thisClassLoader . getParent ();
}
Log . d ( TAG , "root: " + thisClassLoader );
}
}
上述代码输出结果如下:
1
2
3
app : dalvik.system.PathClassLoader
this: dalvik.system.PathClassLoader -->parent: java.lang.BootClassLoader
root: java.lang.BootClassLoader
动态加载示例
本次主要使用DexClassLoader,实现一个简单的动态加载Dex文件,并调用其中的某个方法.
用As建立一个空工程,新建一个类,写一个测试方法.
 1
 2
 3
 4
 5
 6
 7
 8
 9
10
11
12
package org.example.luodst ;
import android.util.Log ;
public class LuoTst {
private final String TAG = "[LuoHun] " ;
public void fun1 () {
Log . d ( TAG , "org.example.luodst.fun1" );
}
}
编译上述工程,从apk中提取出Dex文件,传到手机的临时目录中.
1
adb push classes.dex /data/local/tmp
用As建立另一个工程,来加载上述Dex文件,并调用上述的测试函数fun1.
 1
 2
 3
 4
 5
 6
 7
 8
 9
10
11
12
13
14
15
16
17
18
19
20
21
22
23
24
25
26
27
28
29
30
31
32
33
34
35
36
37
38
39
40
41
42
43
44
45
46
47
48
49
50
51
52
53
54
55
56
57
58
59
60
61
62
63
64
65
66
67
68
69
70
package org.example.luoloaddex ;
import androidx.appcompat.app.AppCompatActivity ;
import android.content.Context ;
import android.os.Bundle ;
import android.widget.TextView ;
import java.io.File ;
import java.lang.reflect.InvocationTargetException ;
import java.lang.reflect.Method ;
import dalvik.system.DexClassLoader ;
public class MainActivity extends AppCompatActivity {
@Override
protected void onCreate ( Bundle savedInstanceState ) {
super . onCreate ( savedInstanceState );
setContentView ( R . layout . activity_main );
Context appContext = getApplicationContext ();
//org.example.luodst.LuoTst
tstDexClassLoader ( appContext , "/data/local/tmp/classes.dex" );
}
public void tstDexClassLoader ( Context context , String strDexFilePath ) {
File optFile = context . getDir ( "opt_dex" , 0 );
File libFile = context . getDir ( "lib_dex" , 0 );
/*
参数一: String dexPath, Dex文件路径
参数二: String optimizedDirectory, Dex优化目录
Android中内存中不会出现上述参数一的Dex文件, 会先优化,然后运行,优化后为.odex文件
参数三: String librarySearchPath, 库搜索路径,jni有so文件
参数四: ClassLoader parent, 类加载器
* */
DexClassLoader dexClassLoader = new DexClassLoader ( strDexFilePath ,
optFile . getAbsolutePath (),
libFile . getAbsolutePath (),
MainActivity . class . getClassLoader ());
Class <?> clazz = null ;
try {
clazz = dexClassLoader . loadClass ( "org.example.luodst.LuoTst" );
if ( clazz != null ) {
try {
Object obj = clazz . newInstance ();
Method func1Method = clazz . getDeclaredMethod ( "fun1" );
func1Method . invoke ( obj );
} catch ( InvocationTargetException e ) {
e . printStackTrace ();
} catch ( NoSuchMethodException e ) {
e . printStackTrace ();
} catch ( IllegalAccessException e ) {
e . printStackTrace ();
} catch ( InstantiationException e ) {
e . printStackTrace ();
}
}
} catch ( ClassNotFoundException e ) {
e . printStackTrace ();
}
}
}
加壳App运行流程
App启动流程
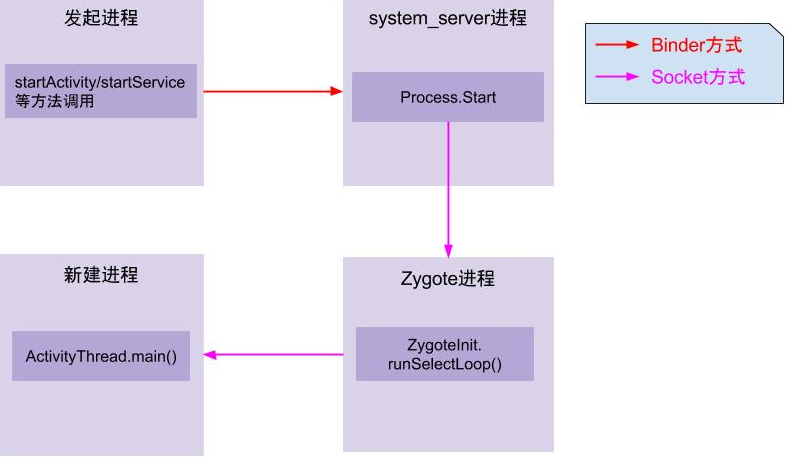
通过Zygote进程到最终进入到app进程世界,我们可以看到ActivityThread.main()是进入App世界的大门.
下面列出ActivityThread这个类中比较重要的成员和字段.
 1
 2
 3
 4
 5
 6
 7
 8
 9
10
11
12
13
14
15
public final class ActivityThread {
//保存创建的ActivityThread实例.
private static volatile ActivityThread sCurrentActivityThread ;
//LoadedApk中有mClassLoader成员,即PathClassLoader,App运行过程中用于加载相关四大组件类的ClassLoader
final ArrayMap < String , WeakReference < LoadedApk >> mPackages = new ArrayMap <> ();
//用于获取当前虚拟机创建的ActivityThread实例.
public static ActivityThread currentActivityThread () {
return sCurrentActivityThread ;
}
//---
}
ActivityThread.main()函数是java中的入口main函数,这里会启动主消息循环,并创建ActivityThread实例,之后调用thread.attach(false)完成一系列初始化准备工作,并完成全局静态变量sCurrentActivityThread的初始化.之后主线程进入消息循环,等待接收来自系统的消息.当收到系统发送来的bindapplication的进程间调用时,调用函数handlebindapplication来处理该请求.
 1
 2
 3
 4
 5
 6
 7
 8
 9
10
11
12
13
14
15
16
17
18
19
20
private void handleBindApplication ( AppBindData data ) {
//step 1: 创建LoadedApk对象
data . info = getPackageInfoNoCheck ( data . appInfo , data . compatInfo );
...
//step 2: 创建ContextImpl对象;
final ContextImpl appContext = ContextImpl . createAppContext ( this , data . info );
//step 3: 创建Instrumentation
mInstrumentation = new Instrumentation ();
//step 4: 创建Application对象;在makeApplication函数中调用了newApplication,在该函数中又调用了app.attach(context),在attach函数中调用了Application.attachBaseContext函数
Application app = data . info . makeApplication ( data . restrictedBackupMode , null );
mInitialApplication = app ;
//step 5: 安装providers
List < ProviderInfo > providers = data . providers ;
installContentProviders ( app , providers );
//step 6: 执行Application.Create回调
mInstrumentation . callApplicationOnCreate ( app );
在handleBindApplication函数中第一次进入了app的代码世界,该函数功能是启动一个application,并把系统收集的apk组件等相关信息绑定到application里,在创建完application对象后,接着调用了application的attachBaseContext方法,之后调用了application的onCreate函数.由此可以发现,app的Application类中的attachBaseContext和onCreate这两个函数是最先获取执行权进行代码执行 的.这也是为什么各家的加固工具的主要逻辑都是通过替换app入口Application,并自实现这两个函数,在这两个函数中进行代码的加解密以及执行权交付的原因.
App运行流程
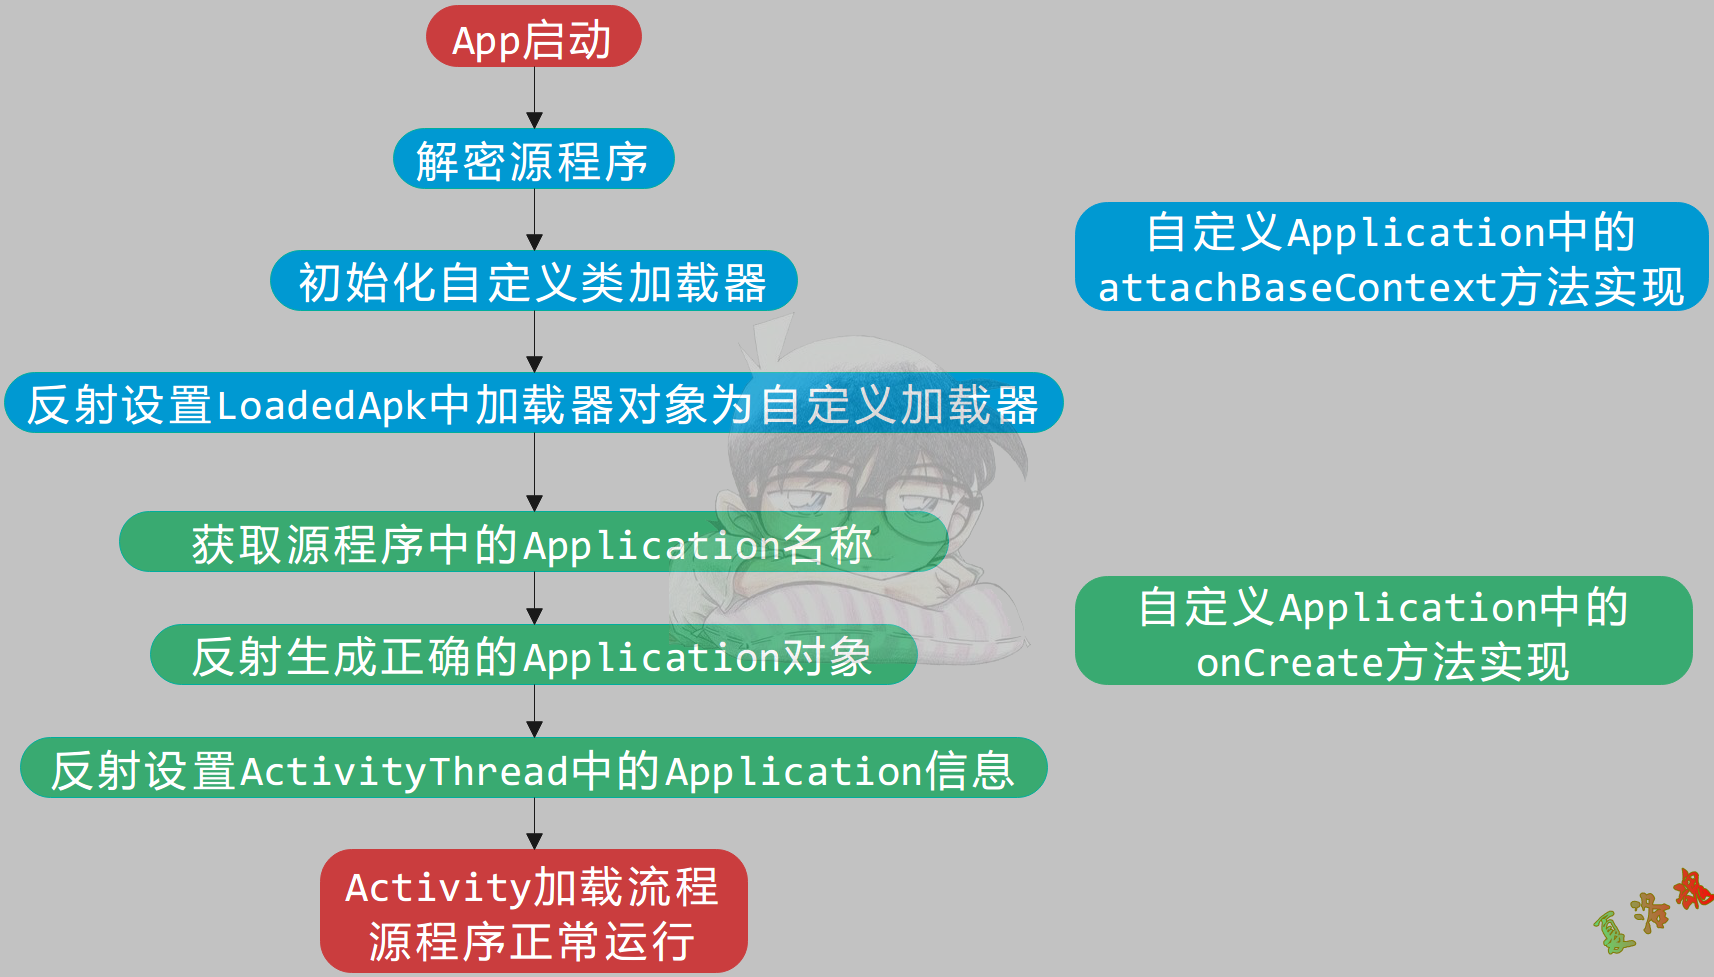
加壳应用的运行流程
当壳在函数attachBaseContext和onCreate中执行完加密的Dex文件的解密后,通过自定义的ClassLoader在内存中加载解密后的Dex文件.为了解决后续应用在加载执行解密后的dex文件中的Class和Method的问题,接下来就是通过利用java的反射修复一系列的变量.其中最为重要的一个变量就是应用运行中的ClassLoader,只有ClassLoader被修正后,应用才能够正常的加载并调用Dex中的类和方法,否则的话由于ClassLoader的双亲委派机制,最终会报ClassNotFound异常,应用崩溃退出,这是加固厂商不愿意看到的.由此可见ClassLoader是一个至关重要的变量,所有应用中加载的Dex文件最终都在应用的ClassLoader中.
因此,只要获取到加固应用最终通过反射设置后的ClassLoader,我们就可以通过一系列反射最终获取到当前应用所加载的解密后的Dex文件 .
生命周期类处理
DexClassLoader加载的类是没有组件生命周期的,也就是说即使DexClassLoader通过对Apk的的动态加载完成了对组件类的加载,但是当系统启动该组件时,依然会出现类失败的异常.
解决方案:
此时有两种解决方案:
替换系统组件类加载器为我们的DexClassLoader,同时设置DexClassLoader的parent为系统组件类加载器.
打破原有的双亲关系,在系统组件类加载器和BootClassLoader的中间插入我们自己的DexClassLoader即可.
代码实现:
用As建立一个空工程,新建一个类,写一个测试Activity.
 1
 2
 3
 4
 5
 6
 7
 8
 9
10
11
12
13
14
15
16
17
package org.example.luodst ;
import android.app.Activity ;
import android.os.Bundle ;
import android.util.Log ;
import androidx.appcompat.app.AppCompatActivity ;
public class LuoTstActivity extends Activity {
private final String TAG = "[LuoHun] " ;
@Override
protected void onCreate ( Bundle savedInstanceState ) {
super . onCreate ( savedInstanceState );
Log . d ( TAG , "org.example.luodst.LuoTstActivity onCreate" );
}
}
编译上述工程,从apk中提取出Dex文件,传到手机的临时目录中.
1
adb push classes.dex /data/local/tmp
方案一:
用As建立另一个工程,来加载上述Dex文件,使用方案一处理Activity.
 1
 2
 3
 4
 5
 6
 7
 8
 9
10
11
12
13
14
15
16
17
18
19
20
21
22
23
24
25
26
27
28
29
30
31
32
33
34
35
36
37
38
39
40
41
42
43
44
45
46
47
48
49
50
51
52
53
54
55
56
57
58
59
60
61
62
63
64
65
66
67
68
69
70
71
72
73
74
75
76
77
78
79
80
81
82
83
84
package org.example.luoloaddex ;
import android.app.Activity ;
import android.content.Context ;
import android.content.Intent ;
import android.os.Bundle ;
import android.util.ArrayMap ;
import java.io.File ;
import java.lang.ref.WeakReference ;
import java.lang.reflect.Field ;
import java.lang.reflect.InvocationTargetException ;
import java.lang.reflect.Method ;
import dalvik.system.DexClassLoader ;
public class MainActivity extends Activity {
@Override
protected void onCreate ( Bundle savedInstanceState ) {
super . onCreate ( savedInstanceState );
setContentView ( R . layout . activity_main );
Context appContext = getApplicationContext ();
startTstActivityFirstMethod ( appContext , "/data/local/tmp/classes.dex" );
}
public void startTstActivityFirstMethod ( Context context , String strDexFilePath ) {
File optFile = context . getDir ( "opt_dex" , 0 );
File libFile = context . getDir ( "lib_dex" , 0 );
DexClassLoader dexClassLoader = new DexClassLoader ( strDexFilePath ,
optFile . getAbsolutePath (),
libFile . getAbsolutePath (),
MainActivity . class . getClassLoader ());
replaceClassLoader ( dexClassLoader );
Class <?> clazz = null ;
try {
clazz = dexClassLoader . loadClass ( "org.example.luodst.LuoTstActivity" );
} catch ( ClassNotFoundException e ) {
e . printStackTrace ();
}
context . startActivity ( new Intent ( context , clazz ));
}
public void replaceClassLoader ( ClassLoader classLoader ) {
try {
//ActivityThread类中有一个静态方法currentActivityThread可以获取当前虚拟机创建的ActivityThread实例.
Class <?> ActivityThreadClazz = classLoader . loadClass ( "android.app.ActivityThread" );
Method currentActivityThread = ActivityThreadClazz . getDeclaredMethod ( "currentActivityThread" );
currentActivityThread . setAccessible ( true );
Object activityThreadObj = currentActivityThread . invoke ( null );
//final ArrayMap<String, WeakReference<LoadedApk>> mPackages = new ArrayMap<>();
Field mPackagesField = ActivityThreadClazz . getDeclaredField ( "mPackages" );
mPackagesField . setAccessible ( true );
ArrayMap mPackagesObj = ( ArrayMap ) mPackagesField . get ( activityThreadObj );
WeakReference wr = ( WeakReference ) mPackagesObj . get ( this . getPackageName ());
Object loadedApkObj = wr . get ();
Class loadedApkClazz = classLoader . loadClass ( "android.app.LoadedApk" );
//private ClassLoader mClassLoader;
Field mClassLoader = loadedApkClazz . getDeclaredField ( "mClassLoader" );
mClassLoader . setAccessible ( true );
mClassLoader . set ( loadedApkObj , classLoader );
} catch ( NoSuchFieldException e ) {
e . printStackTrace ();
} catch ( IllegalAccessException e ) {
e . printStackTrace ();
} catch ( InvocationTargetException e ) {
e . printStackTrace ();
} catch ( NoSuchMethodException e ) {
e . printStackTrace ();
} catch ( ClassNotFoundException e ) {
e . printStackTrace ();
}
}
}
方案二:
用As建立另一个工程,来加载上述Dex文件,使用方案二处理Activity.
 1
 2
 3
 4
 5
 6
 7
 8
 9
10
11
12
13
14
15
16
17
18
19
20
21
22
23
24
25
26
27
28
29
30
31
32
33
34
35
36
37
38
39
40
41
42
43
44
45
46
47
48
49
50
51
52
53
54
55
56
57
58
59
60
61
62
63
package org.example.luoloaddex ;
import android.app.Activity ;
import android.content.Context ;
import android.content.Intent ;
import android.os.Bundle ;
import android.util.ArrayMap ;
import java.io.File ;
import java.lang.ref.WeakReference ;
import java.lang.reflect.Field ;
import java.lang.reflect.InvocationTargetException ;
import java.lang.reflect.Method ;
import dalvik.system.DexClassLoader ;
public class MainActivity extends Activity {
@Override
protected void onCreate ( Bundle savedInstanceState ) {
super . onCreate ( savedInstanceState );
setContentView ( R . layout . activity_main );
Context appContext = getApplicationContext ();
startTstActivitySecondMethod ( appContext , "/data/local/tmp/classes.dex" );
}
public void startTstActivitySecondMethod ( Context context , String strDexFilePath ) {
File optFile = context . getDir ( "opt_dex" , 0 );
File libFile = context . getDir ( "lib_dex" , 0 );
//pathClassLoader --> bootClassLoader
ClassLoader pathClassLoader = MainActivity . class . getClassLoader ();
ClassLoader bootClassLoader = pathClassLoader . getParent ();
//dexClassLoader --> bootClassLoader
DexClassLoader dexClassLoader = new DexClassLoader ( strDexFilePath ,
optFile . getAbsolutePath (),
libFile . getAbsolutePath (),
bootClassLoader );
//pathClassLoader --> dexClassLoader
try {
Field parentField = ClassLoader . class . getDeclaredField ( "parent" );
parentField . setAccessible ( true );
parentField . set ( pathClassLoader , dexClassLoader );
} catch ( IllegalAccessException e ) {
e . printStackTrace ();
} catch ( NoSuchFieldException e ) {
e . printStackTrace ();
}
Class <?> clazz = null ;
try {
clazz = dexClassLoader . loadClass ( "org.example.luodst.LuoTstActivity" );
} catch ( ClassNotFoundException e ) {
e . printStackTrace ();
}
context . startActivity ( new Intent ( context , clazz ));
}
}
加壳技术
发展
Dex加固:
Dex整体加固 :文件加载和内存加载.函数抽取 :在函数粒度完成代码的保护.VMP和Dex2C :Java函数Native化.
So加固:
基于init、init_array以及JNI_Onload函数的加壳.
基于自定义linker的加壳.
识别
是否Native化
函数体无效
函数抽取类壳
✘
✔
VMP壳
✔
Native化
Dex2C壳
✔
Native化
VMP和Dex2C的区分:
VMP :核心原理是Dalvik和Art下的解释器,对Smali指令流的解析执行过程.
可参考:https://github.com/chago/ADVMP
Dex2C :将Java函数转成C函数.
可参考:https://github.com/amimo/dcc
注册地址是否相同
函数逻辑是否相似
VMP壳
✔
✔
Dex2C壳
✘
✘
各种壳解决方案
整体加固:
文件加载 :定位解密文件是关键.内存加载 :加载时机和内存起始地址时关键.
方案 :Dex打开和优化的流程呢以及产出的odex、dex2oat编译的流程和生成的oat文件等等.
函数抽取:
类加载和函数执行前的流程解密.
函数执行中动态自解密.
方案 :关注被抽取的函数的执行流程是关键! 定位被抽取的函数的恢复时机即可.
VMP和Dex2C:
VMP:定位解释器是关键,找到映射关系便可恢复.
Dex2C:基础是编译原理,进行了等价语义转换.彻底还原难度巨大.
方案 :关注JNI相关的api调用是关键,也是分析VMP和Dex2C保护的函数的逻辑的关键.
一代壳(Dex整体加固)
Dalvik
DexClassLoader:
通过对Dalvik下DexClassLoader 加载Dex源码分析,来确定脱壳点.
 1
 2
 3
 4
 5
 6
 7
 8
 9
10
11
12
13
14
15
16
17
18
19
20
21
22
23
24
25
26
27
28
29
30
31
32
//http://androidxref.com/4.4.4_r1/xref/libcore/dalvik/src/main/java/dalvik/system/DexClassLoader.java
DexClassLoader
-> ...
-> ...
-> ...
//进入Native函数
-> openDexFileNative ( Dalvik_dalvik_system_DexFile_openDexFileNative )
-> dvmRawDexFileOpen ( const char * fileName , const char * odexOutputName , RawDexFile ** ppRawDexFile , bool isBootstrap )
-> dvmOptimizeDexFile ( int fd , off_t dexOffset , long dexLength , const char * fileName , u4 modWhen , u4 crc , bool isBootstrap )
{
//---
pid = fork ();
if ( pid == 0 ) {
static const int kUseValgrind = 0 ;
static const char * kDexOptBin = "/bin/dexopt" ;
//---
}
}
//从上述代码来看,通过调dexopt来对Dex文件进行优化
//查看dexopt源代码
//http://androidxref.com/4.4.4_r1/xref/dalvik/dexopt/OptMain.cpp
main
-> fromDex ( int argc , char * const argv [])
-> dvmContinueOptimization ( int fd , off_t dexOffset , long dexLength , const char * fileName , u4 modWhen , u4 crc , bool isBootstrap )
//http://androidxref.com/4.4.4_r1/xref/dalvik/vm/analysis/DexPrepare.cpp#527
//从上述函数,开始脱壳寻找时机.
-> rewriteDex ( u1 * addr , int len , bool doVerify , bool doOpt , DexClassLookup ** ppClassLookup , DvmDex ** ppDvmDex )
-> dvmDexFileOpenPartial ( const void * addr , int len , DvmDex ** ppDvmDex )
-> dexFileParse ( const u1 * data , size_t length , int flags )
-> ...
以上过程出现加载的Dex文件起始地址和大小的地方都是脱壳点.
目前网上常用的脱壳点是dvmDexFileOpenPartial 以及dexFileParse 函数,从这两个函数开始脱,Dump出来的是odex文件.
ART
InMemoryDexClassLoader:
通过对ART下InMemoryDexClassLoader 加载Dex源码分析,来确定脱壳点.
 1
 2
 3
 4
 5
 6
 7
 8
 9
10
11
12
13
14
//http://aospxref.com/android-8.0.0_r36/xref/libcore/dalvik/src/main/java/dalvik/system/InMemoryDexClassLoader.java
InMemoryDexClassLoader
-> BaseDexClassLoader
-> DexPathList
-> makeInMemoryDexElements
-> DexFile
-> openInMemoryDexFile
-> native Object createCookieWithDirectBuffer ( ByteBuffer buf , int start , int end );
native Object createCookieWithArray ( byte [] buf , int start , int end );
-> CreateSingleDexFileCookie
-> CreateDexFile
-> DexFile :: Open
-> DexFile :: OpenCommon
-> DexFile :: DexFile ( const uint8_t * base , size_t size , const std :: string & location , uint32_t location_checksum , const OatDexFile * oat_dex_file )
InMemoryDexClassLoader没有生成oat文件的流程,注意以上流程中出现Dex文件起始地址和大小的地方.
DexClassLoader:
通过对ART下DexClassLoader 加载Dex源码分析,来确定脱壳点.
 1
 2
 3
 4
 5
 6
 7
 8
 9
10
11
12
13
14
15
16
17
18
19
20
21
22
23
24
//http://aospxref.com/android-8.0.0_r36/xref/libcore/dalvik/src/main/java/dalvik/system/DexClassLoader.java
DexClassLoader
-> BaseDexClassLoader
-> DexPathList
-> makeDexElements
-> loadDexFile
-> DexFile . loadDex
-> private DexFile ( String sourceName , String outputName , int flags , ClassLoader loader , DexPathList . Element [] elements )
-> openDexFile
-> private static native Object openDexFileNative ( String sourceName , String outputName , int flags , ClassLoader loader , DexPathList . Element [] elements );
-> OatFileManager :: OpenDexFilesFromOat //最终会调用dex2oat
-> OatFileAssistant :: MakeUpToDate
-> OatFileAssistant :: GenerateOatFileNoChecks
-> OatFileAssistant :: Dex2Oat
//http://aospxref.com/android-8.0.0_r36/xref/art/runtime/oat_file_manager.cc?fi=OpenDexFilesFromOat#OpenDexFilesFromOat
//从上述OatFileManager::OpenDexFilesFromOat这个函数开始分析
//如果说阻断了Dex转Oat过程,系统会尝试加载Dex
OatFileManager :: OpenDexFilesFromOat
-> DexFile :: Open ( const char * filename , const std :: string & location , bool verify_checksum , std :: string * error_msg , std :: vector < std :: unique_ptr < const DexFile >>* dex_files )
-> File OpenAndReadMagic ( const char * filename , uint32_t * magic , std :: string * error_msg )
DexFile :: OpenFile ( int fd , const std :: string & location , bool verify , bool verify_checksum , std :: string * error_msg )
-> DexFile :: OpenCommon
-> DexFile :: DexFile ( const uint8_t * base , size_t size , const std :: string & location , uint32_t location_checksum , const OatDexFile * oat_dex_file )
二代壳(函数抽取)
Dalvik
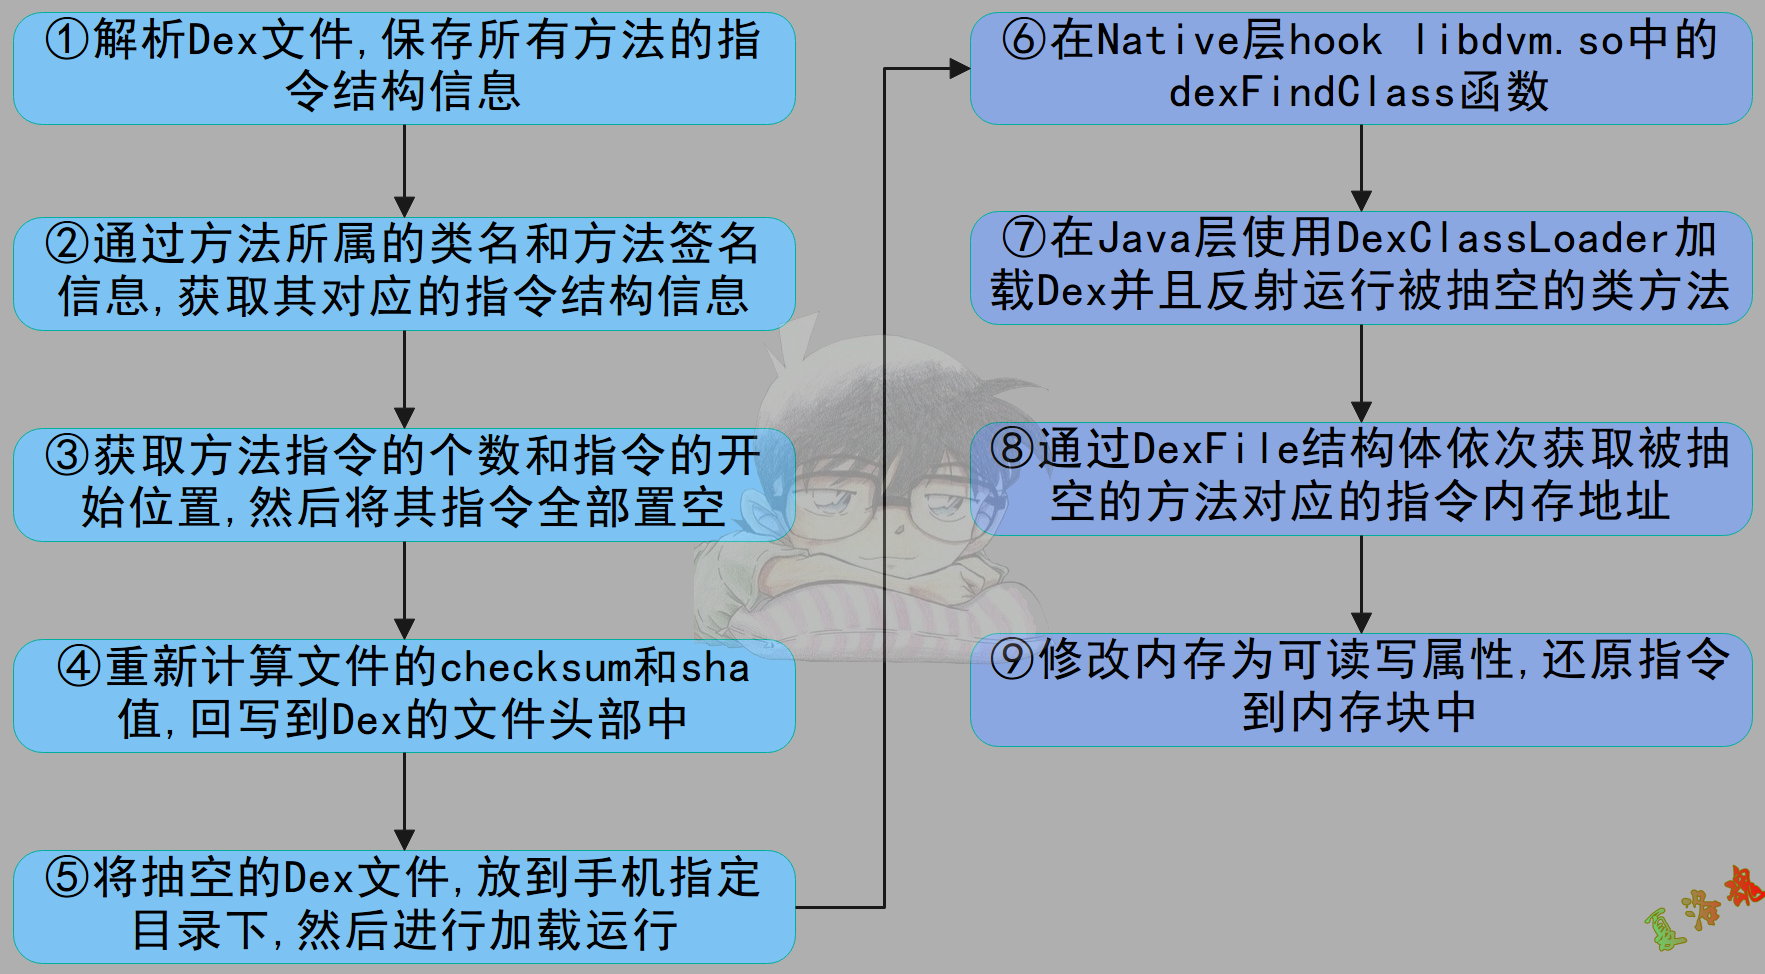
流程图:
上述流程为什么要Hook dexFindClass函数?
我们在Java层主动加载一个类是调用的dexClassLoader.loadClass(可以参考上面的类加载时机 ),来加载类的.因此可以阅读DexClassLoader类的loadClass源码来寻求答案.
http://androidxref.com/4.4.4_r1/xref/libcore/libdvm/src/main/java/java/lang/ClassLoader.java
ART
手工抽取思路:
首先要干掉Dex2oat过程,如果不干掉这个过程,系统对抽取的Dex文件进行编译生成了oat文件,那么我们动态修改的Dex中的Smali指令就不会生效!
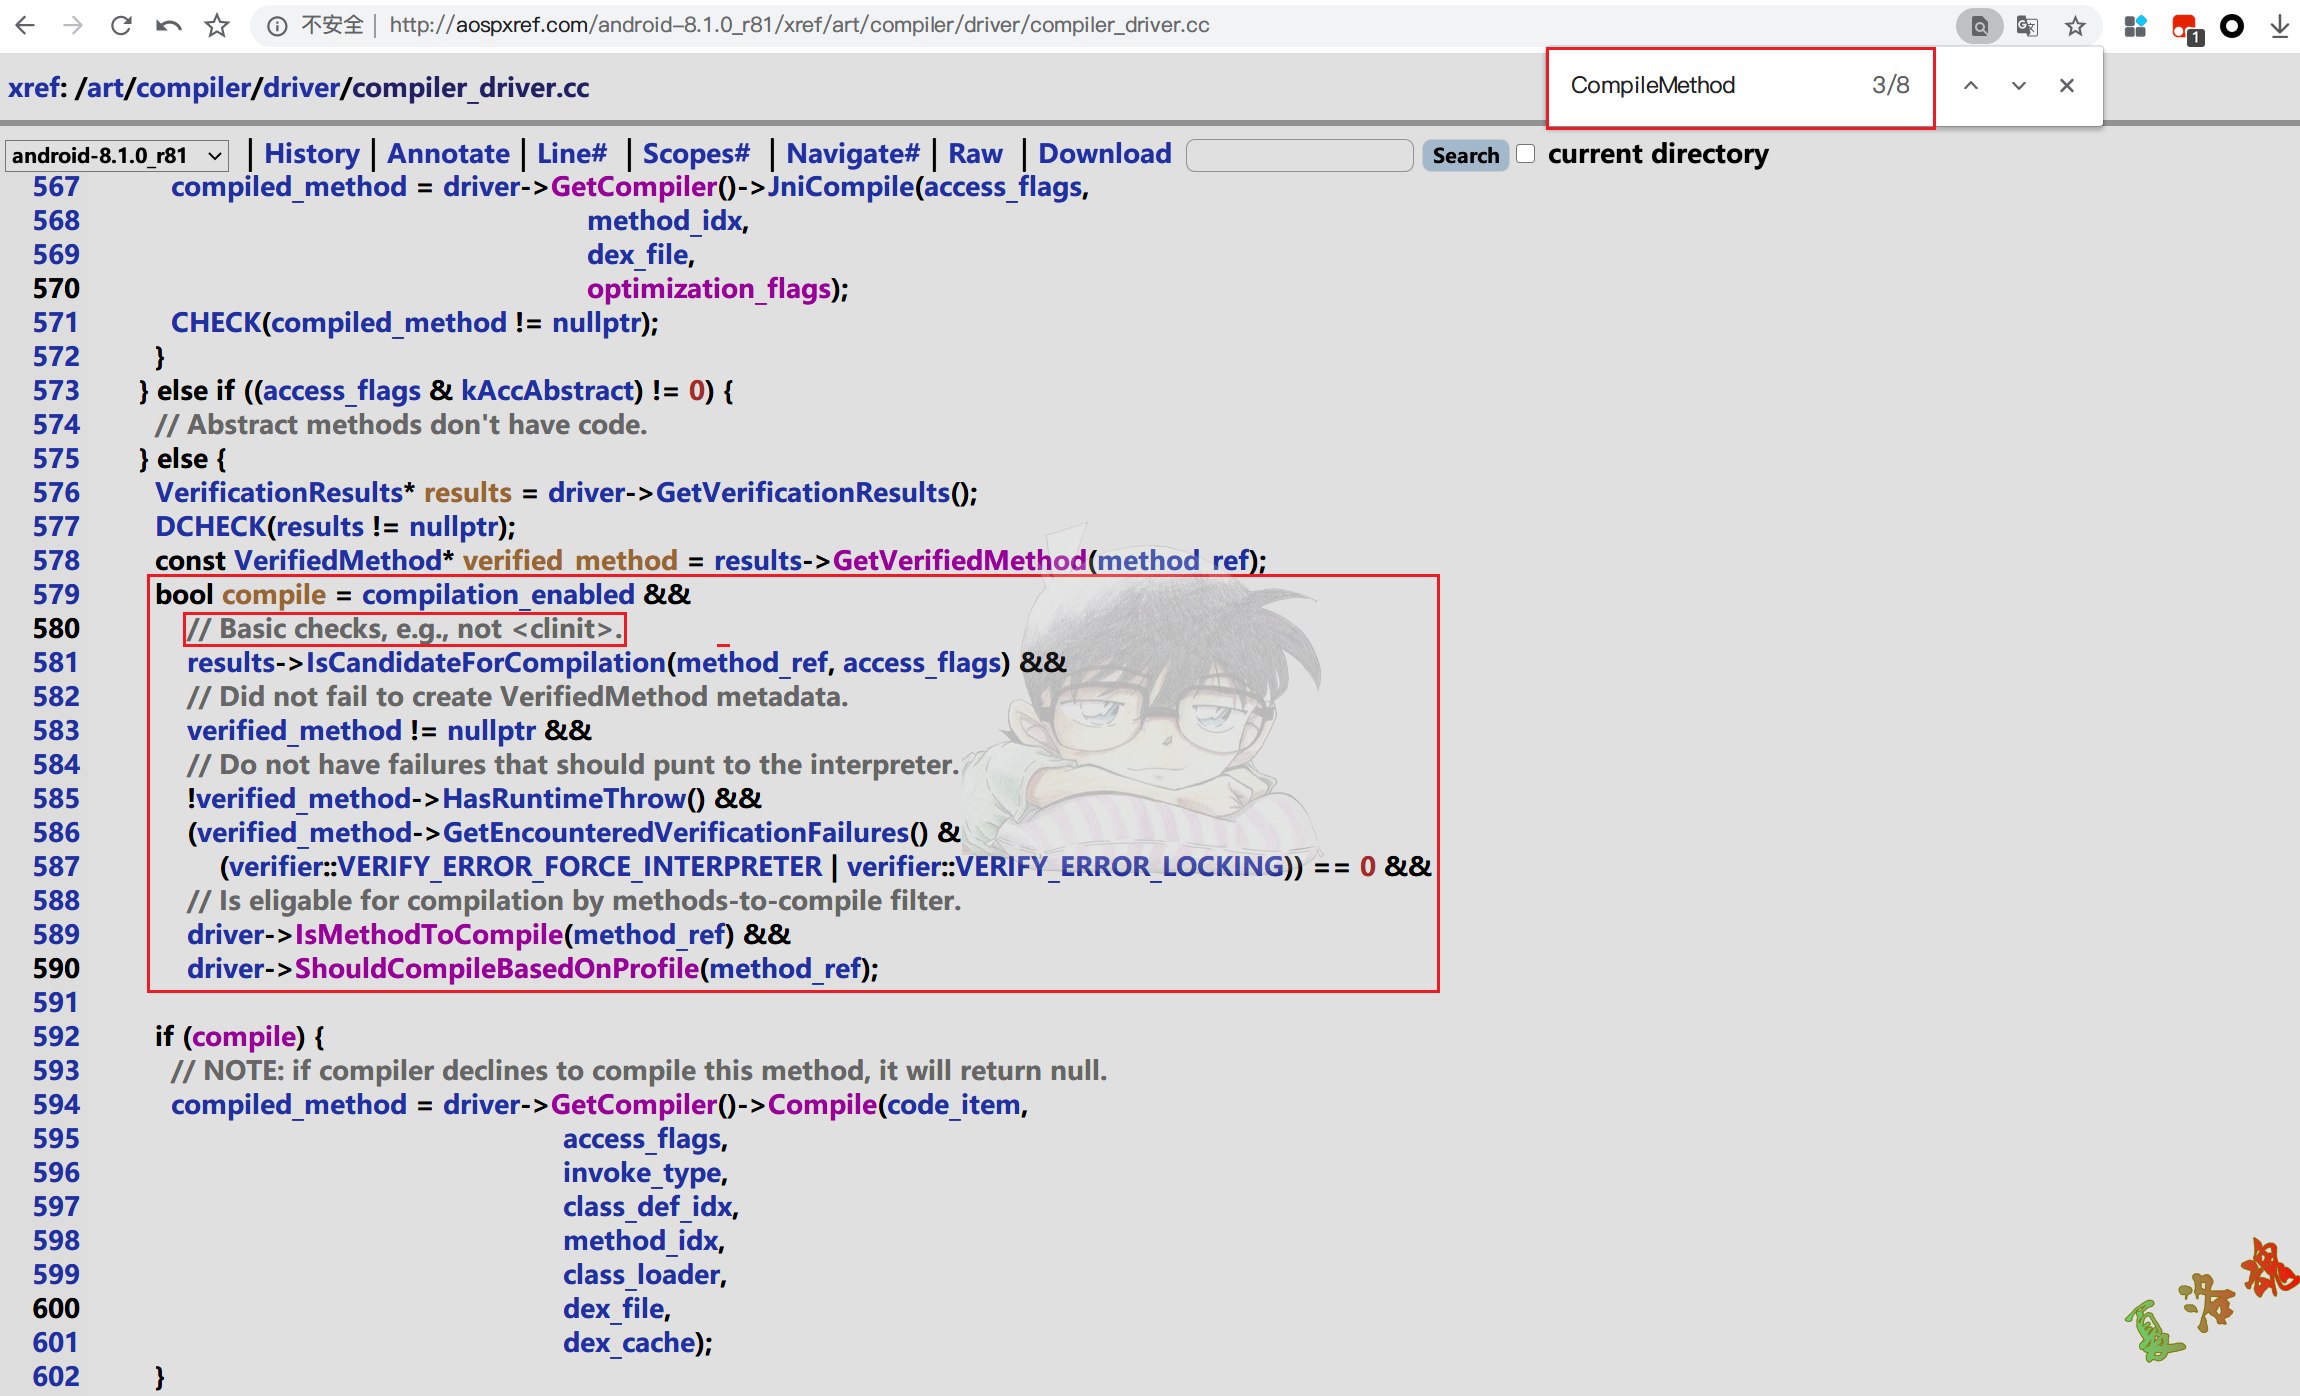
干掉Dex2oat过程可从OatFileAssistant::GenerateOatFileNoChecks这个函数开始分析,因为这个函数内容会调用OatFileAssistant::Dex2Oat这个函数.
解析Dex文件格式,找到要抽取函数的CodeItem,记下其中的指令,将其填充为0.
寻找一个Hook时机(ClassLinker::LoadMethod),在系统执行抽取的函数之前,将其原指令填充回去.
示例:
本次实现环境:Android8.1
准备一个测试Dex文件.
 1
 2
 3
 4
 5
 6
 7
 8
 9
10
11
package com.example.luodst ;
import android.util.Log ;
public class LuoTst {
private final String TAG = "[LuoHun] " ;
public void fun1 () {
Log . d ( TAG , "org.example.luodst.fun1" );
}
}
在AndroidStudio中编译上述代码,生成一个测试Dex文件.
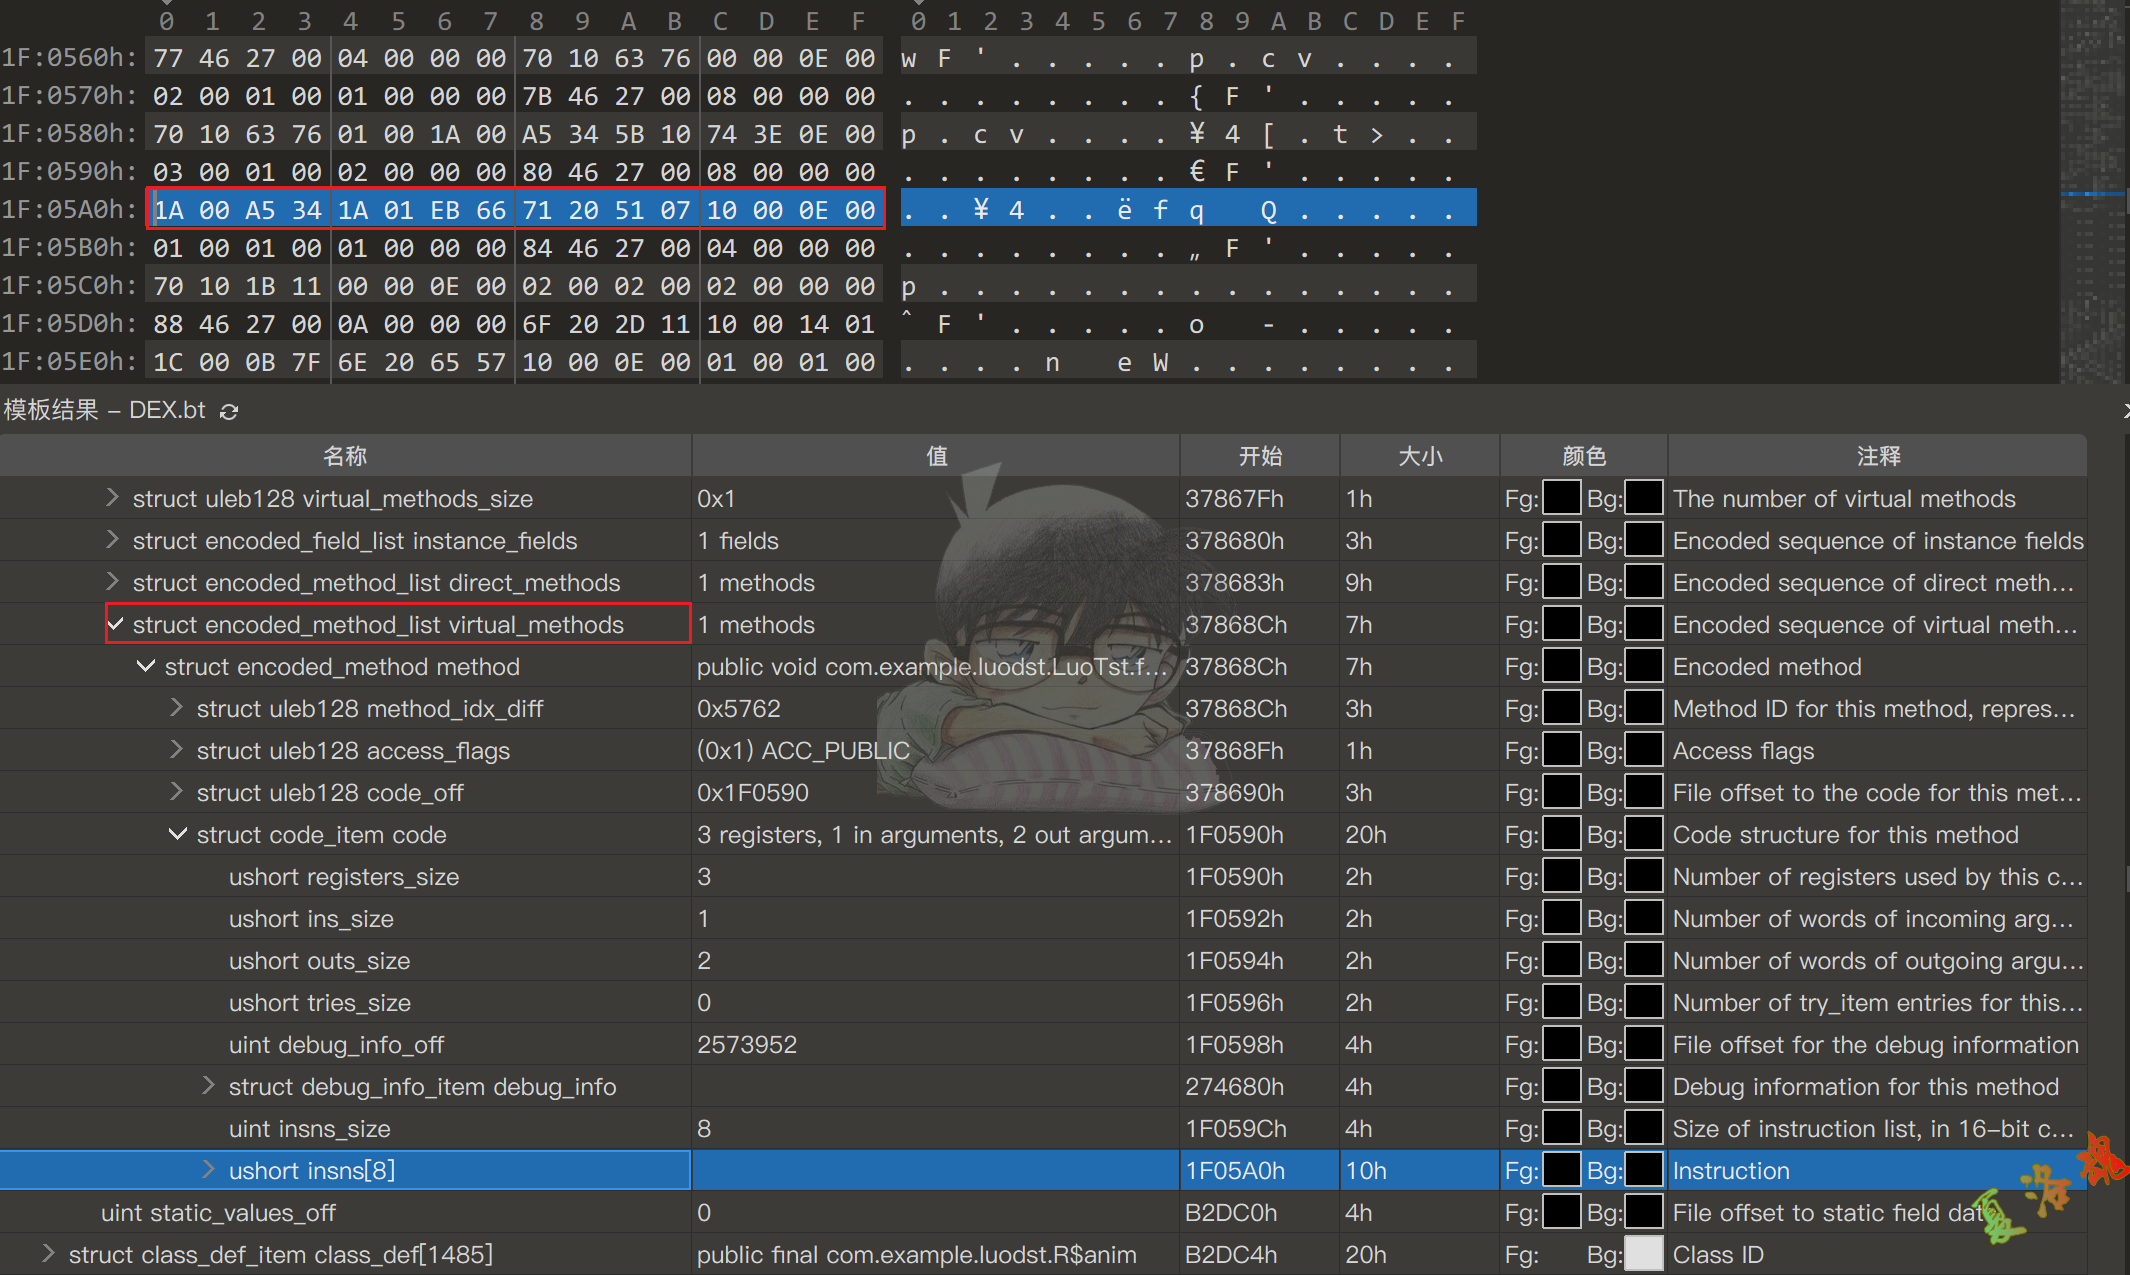
用010Editor打开上述Dex,找到com.example.luodst.LuoTst类的fun1方法二进制指令,记下原来的并将其填充为0
1
2
3
struct class_def_item class_def[1484]	public com.example.luodst.LuoTst	B2DA4h	20h	Fg: Bg:0xE0E0E0	Class ID

struct method_id_item method_id[22370]	void com.example.luodst.LuoTst.fun1()	96C34h	8h	Fg: Bg:0x008080	Method ID
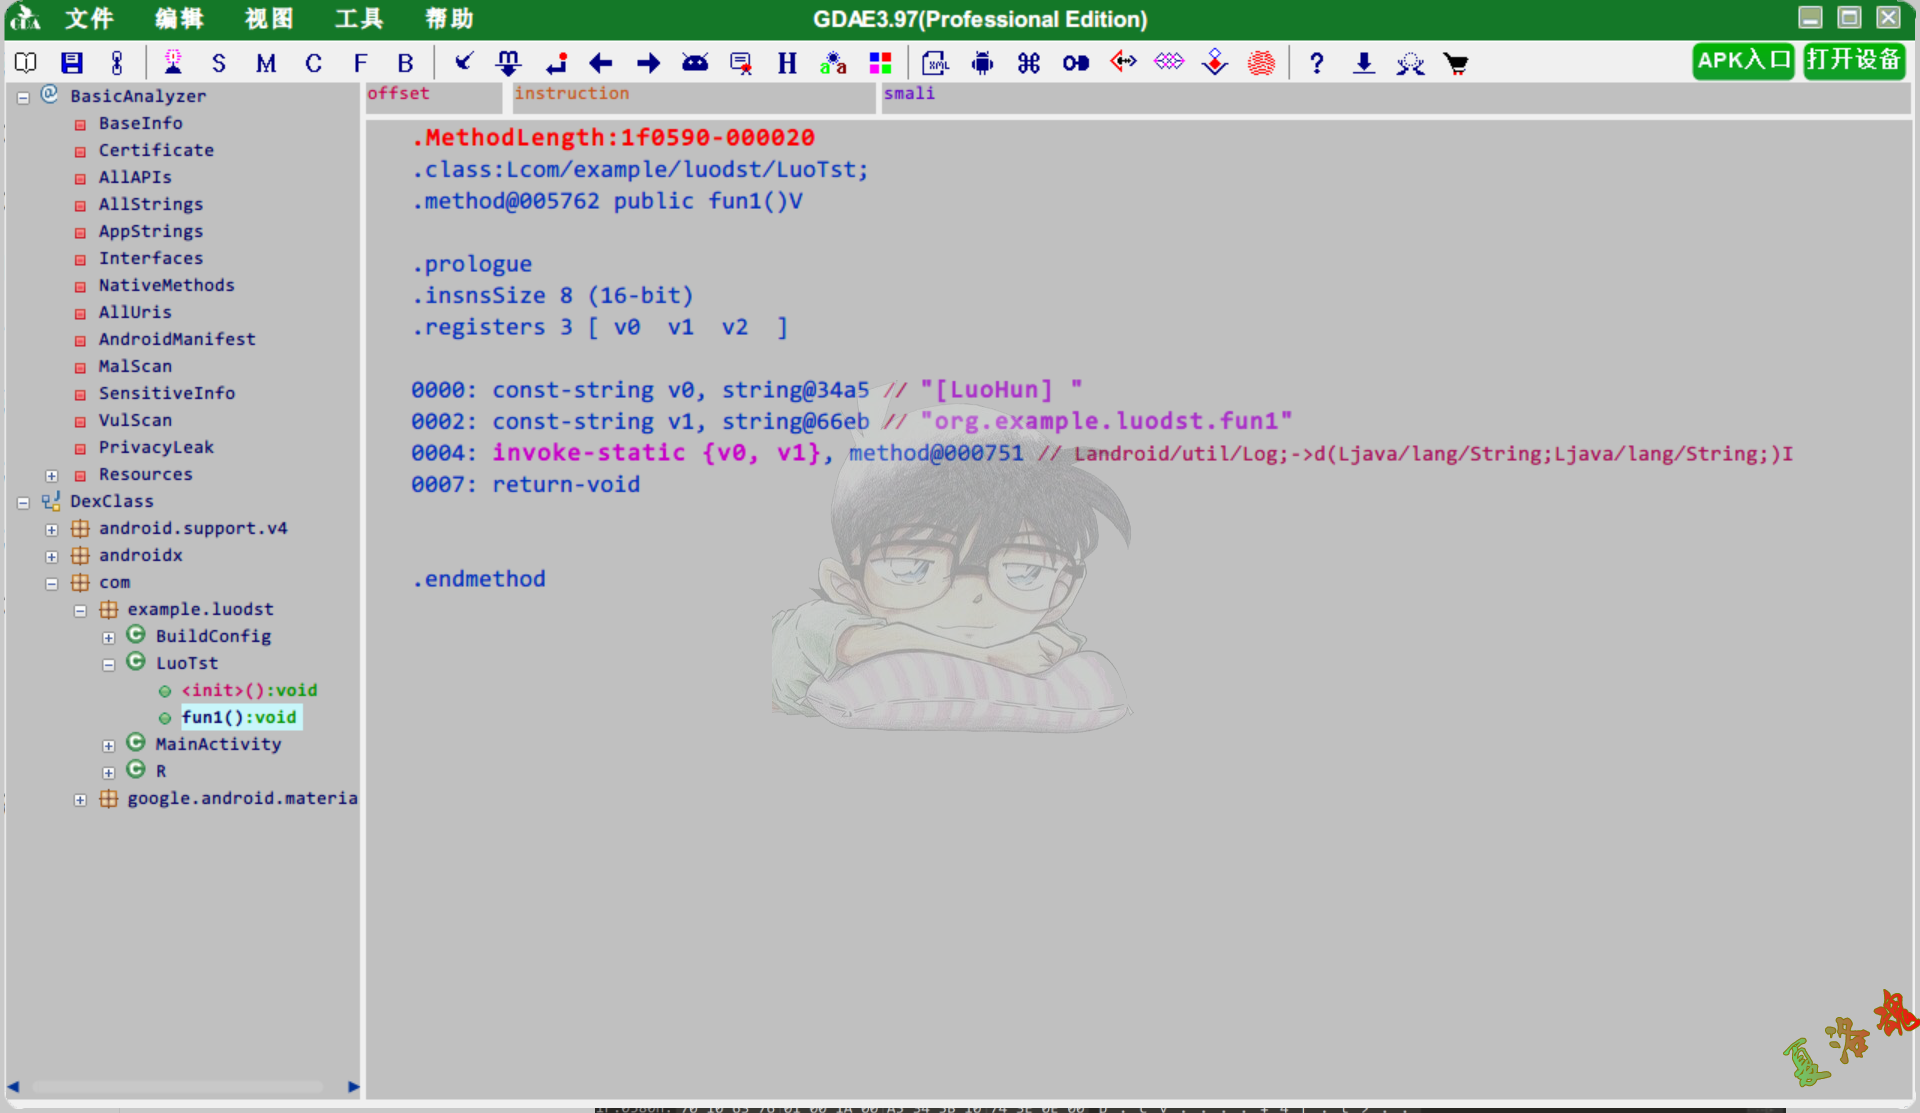
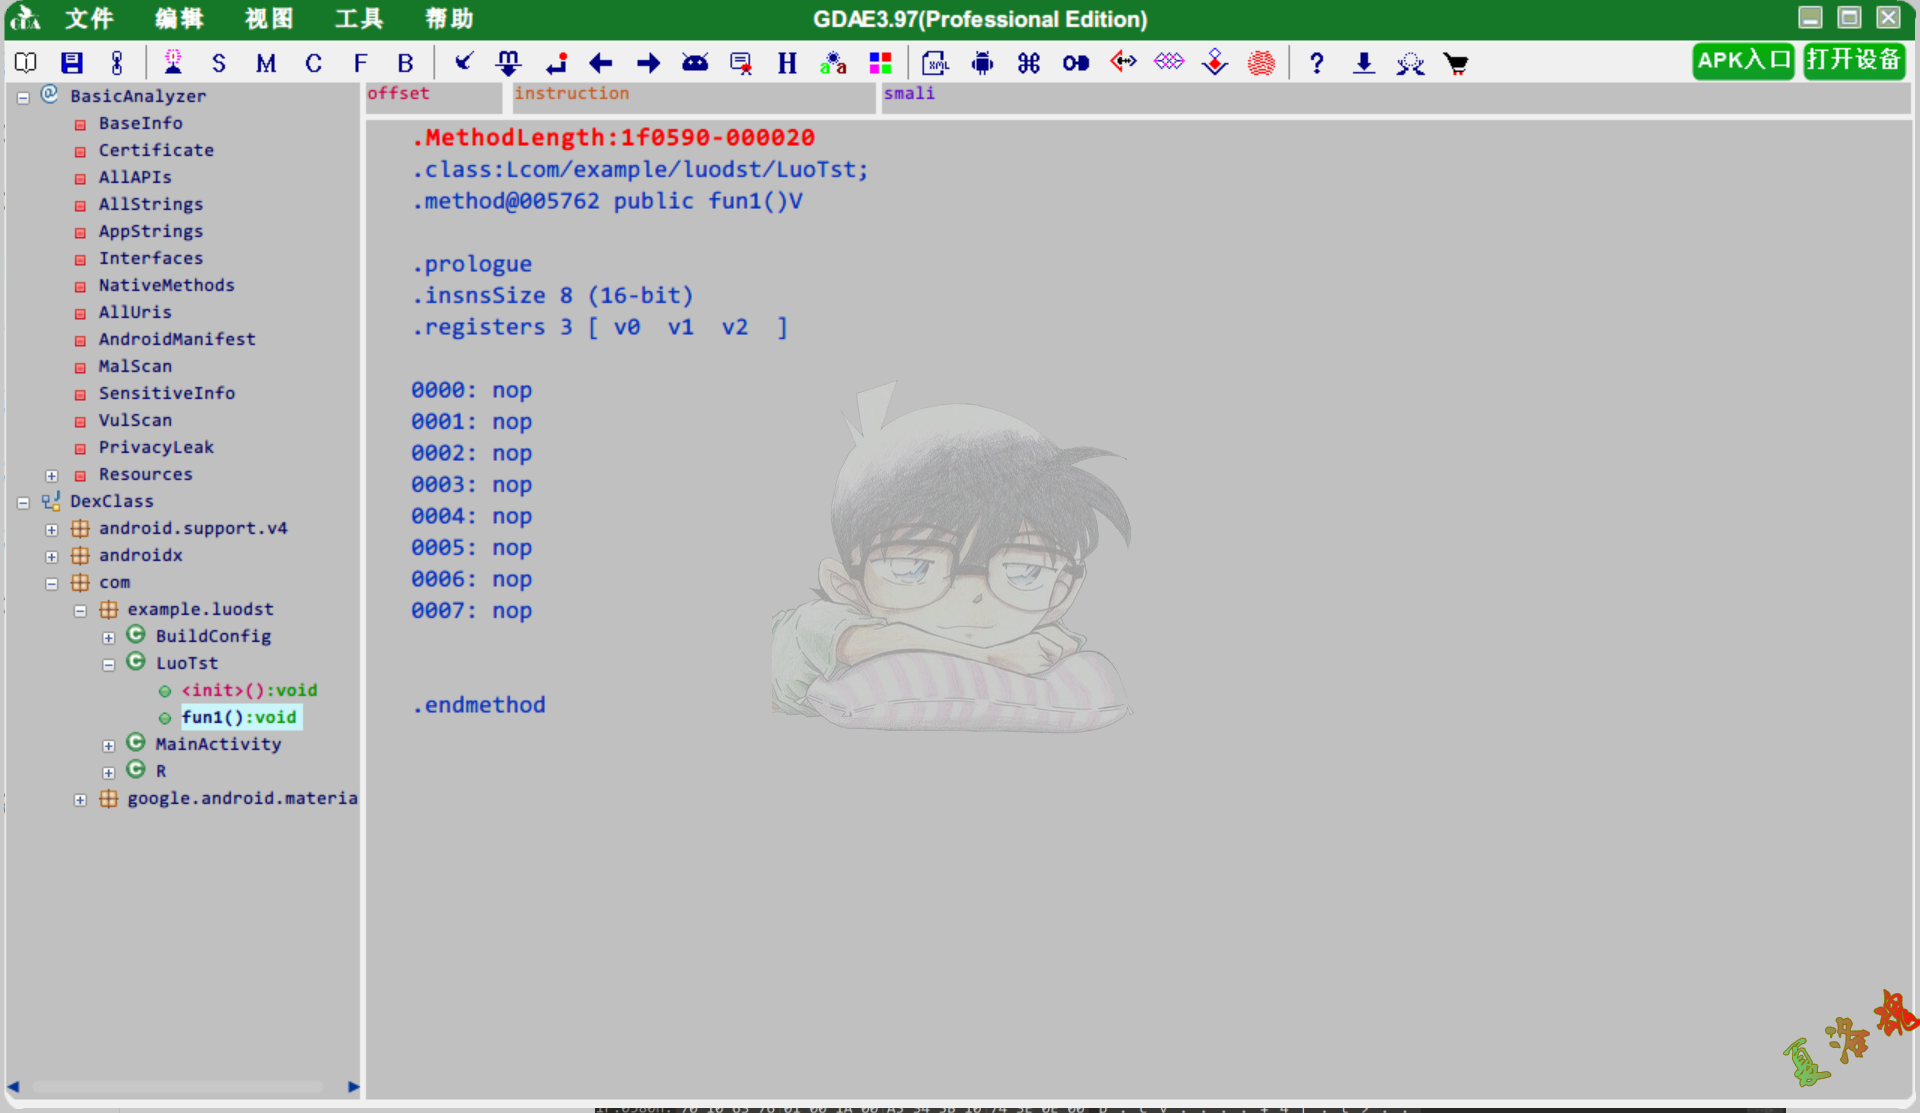
下面用GDA打开上述修改后的Dex文件,来看下现象.
重新计算上述修改后的Dex文件的checksum和sha值,回写到Dex的文件头部中.
将上述修改后的Dex文件,放到手机的/data/local/tmp目录下.
在调用抽取的的函数之前,将原始指令回填(Hook ClassLinker::LoadMethod),反射调用被抽取的函数.
 1
 2
 3
 4
 5
 6
 7
 8
 9
10
11
12
13
14
15
16
17
18
19
20
21
22
23
24
25
26
27
28
29
30
31
32
33
34
35
36
37
38
39
40
41
42
43
44
45
46
47
48
49
50
51
52
53
54
55
56
57
58
59
60
61
62
63
64
65
66
67
68
69
70
71
72
73
//Java
package com.example.luoclassloader ;
import androidx.appcompat.app.AppCompatActivity ;
import android.content.Context ;
import android.os.Bundle ;
import android.util.Log ;
import android.widget.TextView ;
import com.example.luoclassloader.databinding.ActivityMainBinding ;
import java.io.File ;
import java.lang.reflect.InvocationTargetException ;
import java.lang.reflect.Method ;
import dalvik.system.DexClassLoader ;
public class MainActivity extends AppCompatActivity {
private final String TAG = "[LuoHun] " ;
// Used to load the 'luoclassloader' library on application startup.
static {
System . loadLibrary ( "luoclassloader" );
}
private ActivityMainBinding binding ;
@Override
protected void onCreate ( Bundle savedInstanceState ) {
super . onCreate ( savedInstanceState );
binding = ActivityMainBinding . inflate ( getLayoutInflater ());
setContentView ( binding . getRoot ());
//二代壳
SecondShell ();
//反射运行抽空的方法
tstDexClassLoader ( getApplicationContext (), "/data/local/tmp/2.dex" );
}
public void tstDexClassLoader ( Context context , String strDexFilePath ) {
File optFile = context . getDir ( "opt_dex" , 0 );
File libFile = context . getDir ( "lib_dex" , 0 );
DexClassLoader dexClassLoader = new DexClassLoader ( strDexFilePath ,
optFile . getAbsolutePath (),
libFile . getAbsolutePath (),
context . getClassLoader ());
Class clazz = null ;
try {
clazz = dexClassLoader . loadClass ( "com.example.luodst.LuoTst" );
Object object = clazz . newInstance ();
Method func1Method = clazz . getDeclaredMethod ( "fun1" );
func1Method . invoke ( object );
} catch ( ClassNotFoundException e ) {
e . printStackTrace ();
} catch ( IllegalAccessException e ) {
e . printStackTrace ();
} catch ( InstantiationException e ) {
e . printStackTrace ();
} catch ( NoSuchMethodException e ) {
e . printStackTrace ();
} catch ( InvocationTargetException e ) {
e . printStackTrace ();
}
}
public native void SecondShell ();
}
  1
  2
  3
  4
  5
  6
  7
  8
  9
 10
 11
 12
 13
 14
 15
 16
 17
 18
 19
 20
 21
 22
 23
 24
 25
 26
 27
 28
 29
 30
 31
 32
 33
 34
 35
 36
 37
 38
 39
 40
 41
 42
 43
 44
 45
 46
 47
 48
 49
 50
 51
 52
 53
 54
 55
 56
 57
 58
 59
 60
 61
 62
 63
 64
 65
 66
 67
 68
 69
 70
 71
 72
 73
 74
 75
 76
 77
 78
 79
 80
 81
 82
 83
 84
 85
 86
 87
 88
 89
 90
 91
 92
 93
 94
 95
 96
 97
 98
 99
100
101
102
103
104
105
106
107
108
109
110
111
112
113
114
115
116
117
118
119
120
121
122
123
124
125
126
127
128
129
130
131
132
133
134
135
136
137
138
139
140
141
142
143
144
145
146
147
148
149
150
151
152
153
154
155
156
157
158
159
160
161
162
163
164
165
166
//Native
#include <jni.h>
#include <string>
#include <unistd.h>
#include <android/log.h>
#include <fcntl.h>
#include <asm/fcntl.h>
#include <sys/mman.h>
#include <dlfcn.h>
#include <sys/types.h>
#include <sys/stat.h>
//import c header
extern "C" {
#include "hook/dlfcn/dlfcn_compat.h"
#include "hook/include/inlineHook.h"
}
typedef unsigned char byte ;
#define TAG "SecondShell"
#define LOGD(...) __android_log_print(ANDROID_LOG_DEBUG, TAG, __VA_ARGS__)
struct DexFile {
// Field order required by test "ValidateFieldOrderOfJavaCppUnionClasses".
// The class we are a part of.
uint32_t declaring_class_ ;
// Access flags; low 16 bits are defined by spec.
void * begin ;
/* Dex file fields. The defining dex file is available via declaring_class_->dex_cache_ */
// Offset to the CodeItem.
uint32_t size ;
};
struct ArtMethod {
// Field order required by test "ValidateFieldOrderOfJavaCppUnionClasses".
// The class we are a part of.
uint32_t declaring_class_ ;
// Access flags; low 16 bits are defined by spec.
uint32_t access_flags_ ;
/* Dex file fields. The defining dex file is available via declaring_class_->dex_cache_ */
// Offset to the CodeItem.
uint32_t dex_code_item_offset_ ;
// Index into method_ids of the dex file associated with this method.
uint32_t dex_method_index_ ;
};
void ** ( * oriexecve )( const char * __file , char * const * __argv , char * const * __envp );
void ** myexecve ( const char * __file , char * const * __argv , char * const * __envp ) {
LOGD ( "process:%d,enter execve:%s" , getpid (), __file );
if ( strstr ( __file , "dex2oat" )) {
return NULL ;
} else {
return oriexecve ( __file , __argv , __envp );
}
}
//void ClassLinker::LoadMethod(Thread* self, const DexFile& dex_file, const ClassDataItemIterator& it,Handle<mirror::Class> klass, ArtMethod* dst)
// art::ClassLinker::LoadMethod(art::DexFile const&, art::ClassDataItemIterator const&, art::Handle<art::mirror::Class>, art::ArtMethod*)
void * ( * oriloadmethod )( void * , void * , void * , void * , void * );
void * myloadmethod ( void * a , void * b , void * c , void * d , void * e ) {
LOGD ( "process:%d,before run loadmethod:" , getpid ());
struct ArtMethod * artmethod = ( struct ArtMethod * ) e ;
struct DexFile * dexfile = ( struct DexFile * ) b ;
LOGD ( "process:%d,enter loadmethod:dexfilebegin:%p,size:%d" , getpid (), dexfile -> begin ,
dexfile -> size ); //0,57344
//dump dex first time
char dexfilepath [ 100 ] = { 0 };
sprintf ( dexfilepath , "/data/local/tmp/Luo/%d_%d.dex" , dexfile -> size , getpid ());
int fd = open ( dexfilepath , O_CREAT | O_RDWR , 0666 );
if ( fd > 0 ) {
write ( fd , dexfile -> begin , dexfile -> size );
close ( fd );
}
void * result = oriloadmethod ( a , b , c , d , e );
LOGD ( "process:%d,enter loadmethod:code_offset:%d,idx:%d" , getpid (),
artmethod -> dex_code_item_offset_ , artmethod -> dex_method_index_ );
byte * code_item_addr = static_cast < byte *> ( dexfile -> begin ) + artmethod -> dex_code_item_offset_ ;
LOGD ( "process:%d,enter loadmethod:dexfilebegin:%p,size:%d,beforedumpcodeitem:%p" , getpid (),
dexfile -> begin , dexfile -> size , code_item_addr );
if ( artmethod -> dex_method_index_ == 22370 ) { //LuoTst.fun1->methodidx
LOGD ( "process:%d,enter loadmethod:dexfilebegin:%p,size:%d,start repire method" , getpid (),
dexfile -> begin , dexfile -> size );
byte * code_item_addr = ( byte * ) dexfile -> begin + artmethod -> dex_code_item_offset_ ;
LOGD ( "process:%d,enter loadmethod:dexfilebegin:%p,size:%d,beforedumpcodeitem:%p" , getpid (),
dexfile -> begin , dexfile -> size , code_item_addr );
int result = mprotect ( dexfile -> begin , dexfile -> size , PROT_WRITE );
byte * code_item_start = static_cast < byte *> ( code_item_addr ) + 16 ;
LOGD ( "process:%d,enter loadmethod:dexfilebegin:%p,size:%d,code_item_start:%p" , getpid (),
dexfile -> begin , dexfile -> size , code_item_start );
byte inst [ 16 ] = { 0x1A , 0x00 , 0xA5 , 0x34 , 0x1A , 0x01 , 0xEB , 0x66 , 0x71 , 0x20 , 0x51 , 0x07 ,
0x10 , 0x00 , 0x0E , 0x00 };
for ( int i = 0 ; i < sizeof ( inst ); i ++ ) {
code_item_start [ i ] = inst [ i ];
}
//second dump dex
memset ( dexfilepath , 0 , 100 );
sprintf ( dexfilepath , "/data/local/tmp/Luo/%d_%d_after.dex" , dexfile -> size , getpid ());
fd = open ( dexfilepath , O_CREAT | O_RDWR , 0666 );
if ( fd > 0 ) {
write ( fd , dexfile -> begin , dexfile -> size );
close ( fd );
}
}
LOGD ( "process:%d,after loadmethod:code_offset:%d,idx:%d" , getpid (),
artmethod -> dex_code_item_offset_ , artmethod -> dex_method_index_ ); //0,57344
return result ;
}
void hooklibc () {
LOGD ( "go into hooklibc" );
//7.0 命名空间限制
void * libc_addr = dlopen_compat ( "libc.so" , RTLD_NOW );
void * execve_addr = dlsym_compat ( libc_addr , "execve" );
if ( execve_addr != NULL ) {
if ( ELE7EN_OK == registerInlineHook (( uint32_t ) execve_addr , ( uint32_t ) myexecve ,
( uint32_t ** ) & oriexecve )) {
if ( ELE7EN_OK == inlineHook (( uint32_t ) execve_addr )) {
LOGD ( "inlineHook execve success" );
} else {
LOGD ( "inlineHook execve failure" );
}
}
}
}
void hookART () {
LOGD ( "go into hookART" );
void * libart_addr = dlopen_compat ( "/system/lib/libart.so" , RTLD_NOW );
if ( libart_addr != NULL ) {
void * loadmethod_addr = dlsym_compat ( libart_addr ,
"_ZN3art11ClassLinker10LoadMethodERKNS_7DexFileERKNS_21ClassDataItemIteratorENS_6HandleINS_6mirror5ClassEEEPNS_9ArtMethodE" );
// _ZN3art11ClassLinker10LoadMethodERKNS_7DexFileERKNS_21ClassDataItemIteratorENS_6HandleINS_6mirror5ClassEEEPNS_9ArtMethodE
if ( loadmethod_addr != NULL ) {
if ( ELE7EN_OK == registerInlineHook (( uint32_t ) loadmethod_addr , ( uint32_t ) myloadmethod ,
( uint32_t ** ) & oriloadmethod )) {
if ( ELE7EN_OK == inlineHook (( uint32_t ) loadmethod_addr )) {
LOGD ( "inlineHook loadmethod success" );
} else {
LOGD ( "inlineHook loadmethod failure" );
}
}
}
}
}
extern "C"
JNIEXPORT void JNICALL
Java_com_example_luoclassloader_MainActivity_SecondShell ( JNIEnv * env , jobject thiz ) {
//干掉Dex2oat过程
hooklibc ();
//还原抽取的指令
hookART ();
return ;
}
二代壳示例.7z
Fart演变
V1.0 Classloader中Dump
时机:
App中的Application类中的attachBaseContext和onCreate函数是App中最先执行的方法.
因此需要选在Application的onCreate函数执行之后才开始被调用的任意一个函数中.
比如选择在ActivityThread中的performLaunchActivity函数作为时机,来获取最终应用的ClassLoader.
方式:
获取到应用解密后的Dex文件最终依附的ClassLoader之后,通过Java的反射机制最终获取到对应的DexFile的结构体,并完成Dex的Dump.
V2.0 “海量"的脱壳点
时机:
所有类和方法的装载和链接、编译和执行流程之中.
方式:
ART下DexFile类中定义了两个关键的变量:begin_、size_以及用于获取这两个变量的Begin()和Size()函数.
这两个变量分别代表着当前DexFile对象对应的内存中的Dex文件加载的起始位置和大小.
只要有了这两个值,我们就可以完成对Dex的Dump.
V3.0 优中选优
时机:
找到绕过dex2oat的时机.
类的初始化函数始终运行在ART下的inpterpreter模式.
方式:
在解释执行时进行脱壳,实现"绕过"dex2oat.
因此必然进入到interpreter.cc文件中的Execute函数,从而进入ART下的解释器解释执行.
V4.0 双保险
同时在dex2oat和类的初始化流程函数设置"Hook”
Youpk
https://bbs.pediy.com/thread-259854.htm
时机:
App启动后10s开始
方式:
禁用dex2oat:在dex2oat中设置CompilerFilter为仅验证.
1
2
//dex2oat.cc
compiler_options_ -> SetCompilerFilter ( CompilerFilter :: kVerifyAtRuntime );
从ClassLinker中遍历DexFile对象并dump
参考链接
FART:ART环境下基于主动调用的自动化脱壳方案
拨云见日:安卓APP脱壳的本质以及如何快速发现ART下的脱壳点
FART正餐前甜点:ART下几个通用简单高效的dump内存中dex方法
Android免Root权限通过Hook系统函数修改程序运行时内存指令逻辑
Android中实现「类方法指令抽取方式」加固方案原理解析
干掉Dex2oat过程
